Monday, November 30, 2009

Christmas Wish List

I know I promised you an entry about decoupage. But I'm busy, you'll just have to wait. Instead:

Dear Santa:
I love these pillows from the awesome MARIES COSY CUSHIONS, who has an extensive ETSY shop, check it out!


Along with those pillows I desire these curtains, which is actually a cotton shower curtain that I'll convert:


I would wear these everyday if I had them:


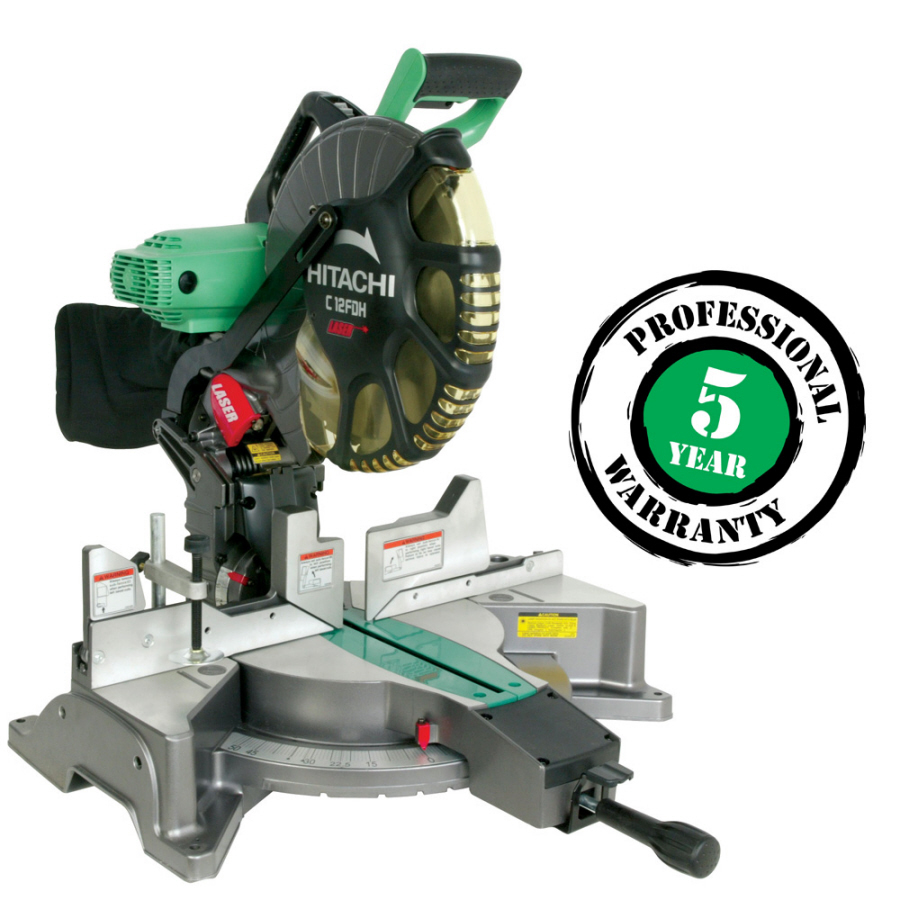
And finally:


With that miter saw I could totally and easy and happily make some of these awesome stretched fabric pieces for so cheap! What an easy way to add color and interest you any room:


So hurry down my chimney tonight :) Merry Last Day of November!

Sunday, November 22, 2009

Fun with a Staple Gun

Quick and sloppy, staple gun crafts rank among my favorite.

CRAFT NUMBER ONE: 1 Hour, 6 Chairs.

A staple gun is essential for your super easy chair upholstery projects. I used 3 yards of 54" upholstery fabric for 6 seat cushions.

BEFORE:


Step 1: Flip over chair and unscrew cushion:


Step 2: Wrap and staple. Be sure to keep it tight, also be aware of your pattern. If you using stripes or centering a pattern on top, be conscious not to make the fabric crooked.


Step 3: Screw cushion back on. DONE!


AFTER:


CRAFT NUMBER 2: Fabric Nursery Art

I sewed this little felt creation for Sherri a while ago but was unhappy with the framing. So I turned to the staple gun for help. I stretched some white fabric on a wooden frame and secured it into place, just like stretching a canvas for painting.


Then I had this nice tight canvas on which to sew my little felt creation:


CRAFT NUMBER 3: Living Room Art
The same process as the baby art, but for a more mature audience. I'm trying to turn my living room to a something that can be described as shabby chic. And you can't do that without doilies.


Guess what? Decoupage tomorrow!

Thursday, November 19, 2009

Wedding Backstory part 3

Part 3: The Pies

Everyone loves pie.


At the wedding we had multiple peach pies, apple pies, pecan pies, wild Maine blueberry pie, pumpkin pies, pineapple pies, blackberry pies, raspberry bavarian cream pies . . . oh my oh my.

Momma's Amazing and Never-Enough-of-it Raspberry Bavarian Cream Pie:


Step 1: Grow raspberries in your yard. This is important. If there are not little crushed up bugs and blood from your pricked fingers in the pie then it is no good. My mother's porch has a raspberry bush growing right up through it. Some litte volunteer seed was dropped and up sprang the most delicous and voracious rasberry bush ever there was. During the berry season you walk out onto the porch with a bowl and pick berries for breakfast- talk about joyism.

Step 2: Make the Graham Cracker crust. Or, ok, you can buy one.

12 whole graham crackers crushed
3 TBSP brown sugar
6 TBSP melted butter
Combine the crumbs sugar and butter. Press into the bottom and sides of a greased pie pan. Bake at 300 F for ten minutes. Cool and set aside.

Step 3: Eat some spoonfuls brown sugar and a handful of berries.

Step 4: Make the Filling
-Wet down a mixing bowl and pop it in the freezer
-Crush 1 quart of raspberries
-Add to that 1 cup of sugar
-Let this stand for 30 minutes
-Soak 2 tsp of gelatin in 3 tbsp water
-Dissolve that into 3 tbsp of boiling water
-Whip 1 cup of whipping cream in your chilled mixing bowl until it peaks.
-Stir water mixture into berry mixture
-Fold cream lightly into the berries before the berry/gelitan mixture sets up
-Pour the whole delicous mess into the cooled pie shell
-Put into fridge and wait patiently until it all sets up and holds its shpe upon cutting.


Yummmm

Mom made Joey and me a heart shaped half-and-half pie for our wedding. Half pecan (Joey's fav)and half raspberry bavarian:


Everyone at the wedding got a little sweeter!:

Sunday, November 15, 2009

Sherri's Bird Mobile

At last.
And it was easier than anticipated. The best part was collecting the sticks.

Step 1: Cut out the Fabric
There is a free pattern at this site. Print it off, cut out the paper, and pin to your fabric and cut out the shapes for 10 birds.


Step 2: Pin the belly fabric to the feather fabric:


Step 3: Sew all around the birdy with a 1/4" or so allowance. Make sure to leave the tail open:

Step 4: Turn inside out. Use something pointy- tweezers or seam rippers work great:


Step 5: Stuff birdies. Make em good and fat

Step 6: Fold together the tail ends and stitch. That finishes the birdies!


Step 7: Go for a walk and collect really sturdy straight sticks. You need three, one real long the other 2 medium sized. Prepare the sticks by removing the bark with a knife or razor (or leave the bark on, whatever):


Step 8: Sand the sticks smooth, then seal them with a glaze (I used an aerosol glaze spray).

Step 9: Start from the bottom- start with the single hanging branch-free bird. Use hook with screws on one end. I used a drill and it was fast:


Step 10: Just play around with the balancing. Sew on birdies from their stomachs. If they are still a little loose, use a little dot of hot glue

Step 11: Voila!


Thursday, November 12, 2009

Super Easy Curtains

It was fate that Joann Fabric was having a 50% off on all 54" Home Decor fabric right when we realized that our house badly needed curtains.

Sewing your own curtains can be easy if you follow this pattern. This style is simple and contemporary with cute loops and buttons.

I did not have to line these curtains because I chose heavy through-woven upholstery (looks the same on either side). If you choose a thin printed cotton, buy curtain backing and sew together with each curtain panel.

Step 1:
Measure your windows. Each window is made up of 2 panels. The end product should overlap your window by about 2"-3" on each side and you should allow for 2 inches on each side for your seams. It's up to you how long you want your curtains to be, but whatever the length, add on 4 inches total for seam allowance at top and bottom.

Step 2: Cut fabric to size.
Step 3: Fold over an edge (about a 1/2" to 1" fold) and steam with an iron into place


Fold over again and steam into place


Pin perpendicular to the fold.

Step 4: Sew the seam


Repeat with all side of your panels. Now your done with that part!

Step 5: Make loops out of different fabric. Follow the same basic steps you did for the panel- cut long strips, steam over the sides, stitch the ends


Step 6: Sew the loops onto the panels. One loop on each end of the panel and 1 or 2 in the middle depending on the size


Step 7: Stitch on a cute button


Step 8: Hang curtains, step back and be proud of yourself


On a side note, my passion vine bloomed the other day. My mom planted the vine from 2 seeds in early spring before the wedding. The two vines slowly grew as the wedding approached and the night before the big day the two vines intertwined- fate! The blooms last for just one day so lucky I was watering in the sun room that day:

Sunday, November 8, 2009

Thread Your Sewing Machine

So you got this sewing machine from your grandmother, or picked one up at a yard sale. But it's been sitting in the box picking up dust ever since. Once you learn how to thread your machine, everything else it is just trail and error and experimentation. Once you work out the quirks of your machine, then endless creations ensue!

NOTE: These are instructions for my sewing machine. All sewing machines differ but this is a start. With a little intuition you should figure yours out easily enough.

STEP 1: Start your bobbin.
A bobbin is the little plastic or metal wheel that fits underneath the needle plate of a sewing machine. A machine's stitch is made from two threads- one through the eye of the needle and one up from the bobbin. Thread runs off the bobbin, gets picked up by the needle’s thread and forms the bottom part of a seam.


To thread your bobbin, place a spool of thread on the thread pin located on the top of the machine like the picture above. Place an empty bobbin on the bobbin pin. Wind a few inches around your empty bobbin. Push the bobbin over into the lock position. Press down on the foot pedal slowly while holding the winding thread.

Slowly and evenly fill up your bobbin.

Step 2: Move the bobbin into the bobbin casing:


Take the end of the thread and wind through the thread slits. You'll have to refer to your user manual for this. It's hard to explain, but there is a little "path" in the bobbin casing that the thread must be pulled through. Pull out a few excess inches of thread.
Snap the bobbin casting into place underneath the needle plate:


Step 3: Thread the needle
Take hold of the thread end and pass it through the designated threading points on the top of the machine casing, then down toward the tension assembly. SO that means there are several levers obstacles that the thread must wind around. First is at the top.


After winding around the 2nd top lever, thread through the eye of the needle. Don't forget to push thread through the little clip before hand though (see picture)


Thread the needle from the front or back of the needle. Pull a few inches of thread through the eye of the needle and pull the thread to your left.


After threading needle, pull through a lot of extra. Grip excess with one hand and rotate hand wheel (picture below) with the other.


Rotating the hand wheel will plunge the needle into the bobbin below and will grab the bobbin's thread and pull a loop back through.


Grab the loop and the needle thread and pull together until you have an even amount of excess from both threads. Place your cloth underneath the foot, lover the foot lever to lock your cloth into place (feel around for the foot lever, it's always right near the needle). Slowly start your stitching!


A nice tip my mom taught me:
If you pin your cloth perpendicular to the stitch, you can sew RIGHT OVER the pins without having to remove them first!


HAVE FUN! If anything is unclear then please comment and I will try to answer your questions.

Wednesday, November 4, 2009

Wedding Backstory Part 2

Part 2: Mason Jars


In creating my dream 1930's country wedding, I knew mason jars had to be involved. Growing up, mason jars were everywhere. Mom canned everything in our garden. At any given time one could find mason jars of all sizes on the kitchen shelves, sink, refrigerator, laundry room or garage.

The Jams :
Mom offered to make jams and jellies for our table favors, perfect. I instantly printed a whole bunch of 'Spread the Love' and 'Relish Love' labels for the jars. All of the jams and jellies and relishes featured locally and home grown ingredients.

There was jalapeno jelly, mint jelly, raspberry jam, blackberry jam, blueberry jam, apple butter, "blue raspleberry" (which I think was a blueberry/raspberry apple butter), beet relish, basil green bean pickles, dill bean pickles, piccalilli (green tomato relish) and curried squash pickles...! Needless to say, one one left without their favors.
Jalapeno Jelly:
Follow measurements on jelly pectin box, but this gives an idea:
12 jalapenos
2 cups cidar vinegar
6 cups sugar
2 packets of liquid fruit pectin

Blend 12 jalapenos and 1 cup of cider vinegar until smooth in processor
Add remaining cider and all sugar
Boil over high heat stirring frequently for 10 min
Remove from heat, skim off foam, put immediately into jars and cap them.
Submerge 1-2 inches into boiling bath of water for 10 minutes

Raspberry Jam
2 quarts raspberries
5 cups of sugar
1 box powdered gelatin
1/2 tsp butter
Smash fruit with a spoon, measure our 5 cups of smashed fruit.
Mix with box of gelatin and add 1 tsp butter
Put on stove under high heat and stir until it has a full rolling boil
Add sugar all at once
Bring to boil again stirring constantly
Keep at rolling boil for 1 minute
Remove from heat, skim off foam, cap immediately and cap. Follow same water bath as Jalapeno jelly.

Dilly Beans:
Makes 10 1 pt jars
4 lbs snapped green beans per jar
1/2 tsp crushed red pepper flakes per jar
1/2 tsp mustard seed per jar
1/2 tsp dill seed per jar
1 whole clove garlic per jar ;)
5 cups vinegar
5 cups water
1/2 cup pickling salt
Wash jars.
Put all 'per jar' ingredients into their jars
Boil water, vinegar and salt. Pour boiling liquid into jars.
Tighten lids and place into boiling water bath for 20 minutes.

The Flowers
So of course the flower vases had to be mason jars. Lots came from dad's garage. They needed cleaning.

Mom planted all of these beautiful flowers for the tables and bouquets, not to mention all the surrounding fields and ditches that grew an extraordinary amount of weedy wonderful wild flowers this summer (thanks WV). The morning of the wedding Mom, Martin and Hanna picked and picked and came up with this:


My bridesmaids and I sat on the cool porch a few hours before the wedding putting together the flowers for the table and our bouquets. Playing with flowers with my closest friends and family was such a calm and wonderful way to spend the last hours before such a big event. It turns out that Sherri had quite a knack for flower arrangement:

Our Process:
Put long pointy flowers in the back
Put bushy flowers in the middle
put big faced flowers up front
fill in with weedy flowers
cut stems at an angle
wrap with pretty ribbon
pin in place with colorful plastic headed straight pins

In the end, beautiful flowers abounded and our bouquets were completely unique to each lady:


If YOU love mason jars as much as I do, check out Jill's gift jars.